The Fall 2024 release of Microsoft Dynamics 365 Business Central includes several updates to 1099 processing:
- E-filing IRS 1099 Forms: you can now e-file IRS 1099 forms directly from Business Central without needing additional integration. This feature is currently in public preview.
- Enhanced Setup Options: the setup process for 1099 forms has been streamlined. You can now create new setups or transfer existing data from previous solutions more easily.
- TIN Protection: there’s an option to mask or protect Taxpayer Identification Numbers (TINs) on printed forms, showing only the last four digits to enhance security.
To use the new features, there are some setups you will need to here. Below is a step-by-step guide.
Set Up the IRS 1099 Forms
The Internal Revenue Service (IRS) requires one or more versions of the 1099 tax form for payments to vendors. Copies of these forms must be sent to vendors annually on or before the last day of January. On your purchase documents, you can specify that the document is 1099 liable, and you can specify the 1099 code for the vendor.
Transmit Tax Data using 1099 Form
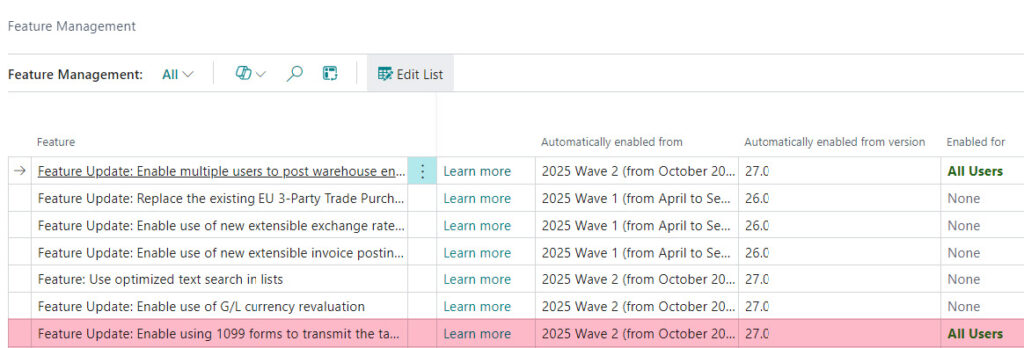
- Choose search icon, enter Feature Management, and then choose the related link.
- Find the following feature: Feature Update: Enable using 1099 forms to transmit the tax data to the IRS in the United States that you want to enable.
- In the Feature column, choose the three vertical dots, and then choose the Select More action.
- Select the checkbox for all the features that you want to edit, and then choose Edit List.
- In the Enabled for column, change the status to All Users.
- Choose the Yes button.
- Become familiar with the feature, and then choose the Next button.
- Specify the relevant Reporting Year.
- Define the setup data you use for IRS forms.
- By selecting the Create new setup field, you can choose to create a new default setup data in an app.
- To transfer the existing data from the 1099 base application, select the Transfer Existing Data field.
- Specify how the IRS forms work with documents, because you can decide to choose the Collect Details For Line field. If you select this field, details are collected from the IRS 1099 Form Doc Line Details page for each of Calculated Amounts in the IRS 1099 Form Document. This option requires extra space in the database.Note: If you don’t select this field, the total amount is calculated without the details.
- You can choose one or more options during setup.
- Protect TIN (Taxpayer Identification Number) to mask or protect TIN for vendors or for both vendors and your company. You can also choose not to protect TIN numbers.Note: This protection option lets you print only the last four digits on your printing forms, truncating the first five digits of the nine-digit number and replacing these digits with Xs, following the IRS regulations (example: XXXXX1234), and providing more security when sending documents using the email option, protecting the recipient from identity theft.
- Finish the setup.
Assisted Setup for 1099 IRS Forms
You may also use the assisted setup action, if you did not choose to do so in Feature Management.
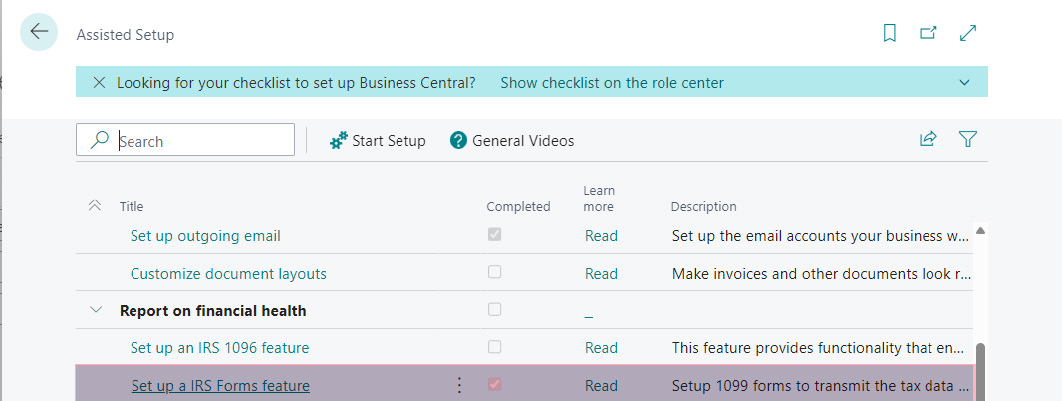
- Choose search icon, enter Assisted Setup, and then choose the related link.
- Choose the Set up a IRS Form feature under the Report on financial health section.
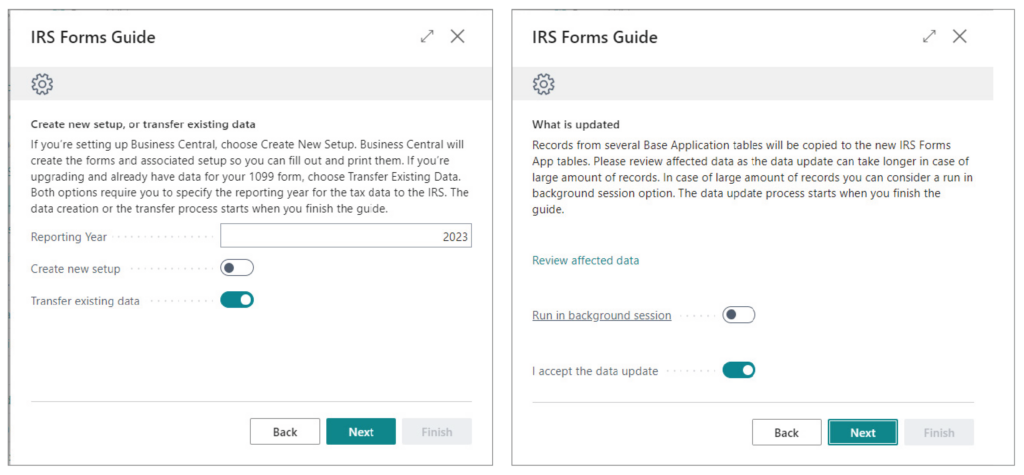
- In the IRS Form Guide, select the 1099 Reporting Year you will be creating.
- If you have used Business Central for 1099 processing in the past, you may also select Transfer Data.
- Click Next to move to the next set up screen.
- Review and accept the data update.
- Click Next to move to the next set up screen.
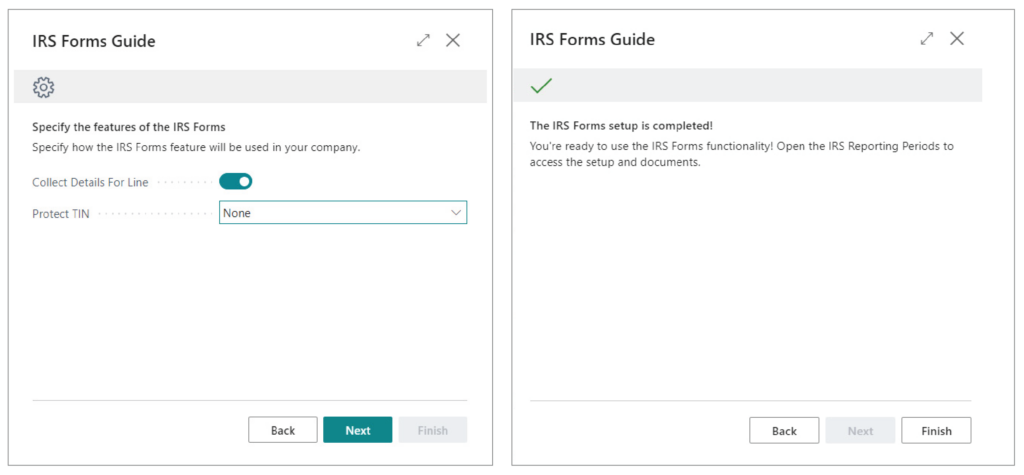
- Specify how the IRS forms work with documents, because you can decide to choose the Collect Details For Line field. If you select this field, details are collected from the IRS 1099 Form Doc Line Details page for each of Calculated Amounts in the IRS 1099 Form Document.
- You can choose one or more options during setup.
- Protect TIN (Taxpayer Identification Number) to mask or protect TIN for vendors or for both vendors and your company. You can also choose not to protect TIN numbers.
- Click Next to move to the next set up screen.
- Select Finish to complete the setup.
Manual Setup for 1099 IRS Forms
If you couldn’t finish the setup when you enabled this feature, or you want to modify or add configurations, follow these steps:
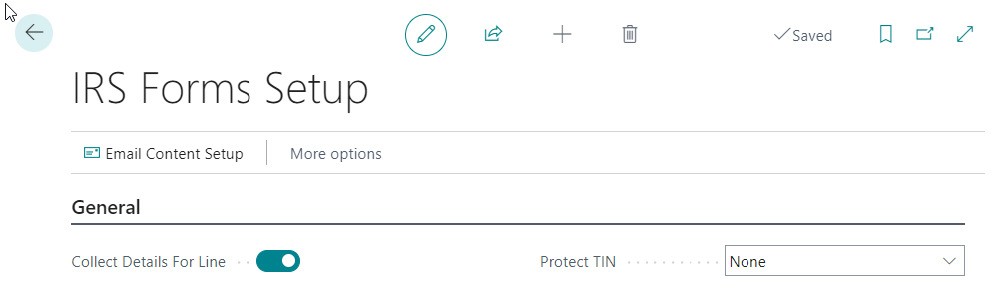
- Choose search icon, enter IRS Forms Setup, and then choose the related link.
- On the General FastTab, you can change the setup for the Collect Details For Line and Protect TIN fields.
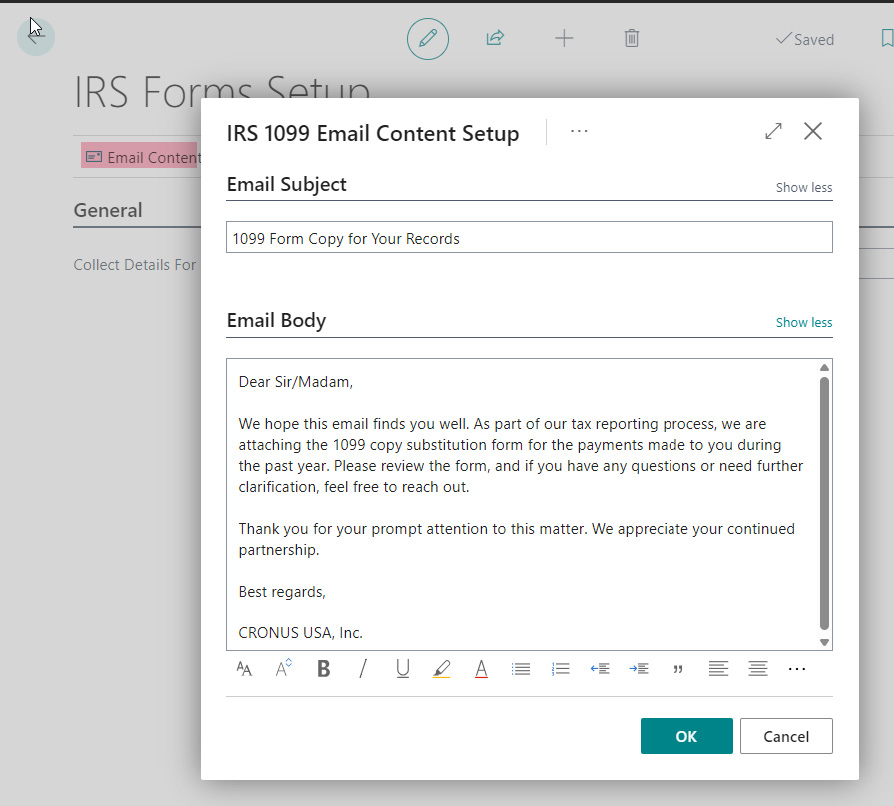
 In the “Email Content Setup” Action, you can also set up details for the email you want to send to your recipients:
- Change the subject you in the Email Subject FastTab.
- Change the email body in the Email Body FastTab. To edit your email body, use the rich text editor.Note: Be sure to click Show More if there are no fields visible.
- Close Page.
Reporting Periods and Form Set Up
To configure reporting periods and forms, follow these steps:
- Choose search icon, enter IRS Reporting Periods, and then choose the related link.
- On the IRS Reporting Periods page, specify the time period that the report applies to in the Starting and Ending Date fields.

- . To set up specific 1099 forms for this period, use the Forms action to open the IRS Reporting Periods page.
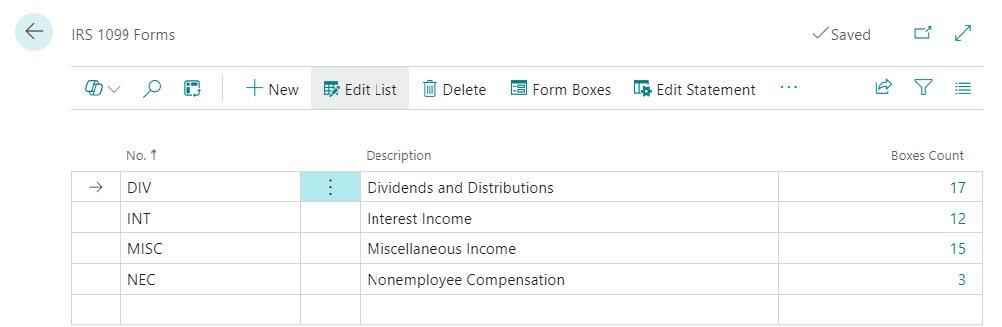
- On the IRS 1099 Forms page, specify 1099 form types, such as MISC, NEC, and so on. Because these form types have more than one source with different rules, you must set them up. To do so, run the Form Boxes action to open the IRS 1099 Form Boxes page.
- On the IRS 1099 Form Boxes page, set up sources for your form type using the Number and Description fields. You must fill in the Minimum Reportable Amount field based on the IRS instruction for this reporting year. The minimum reportable amounts can be populated whether or not you need to report a certain form box.
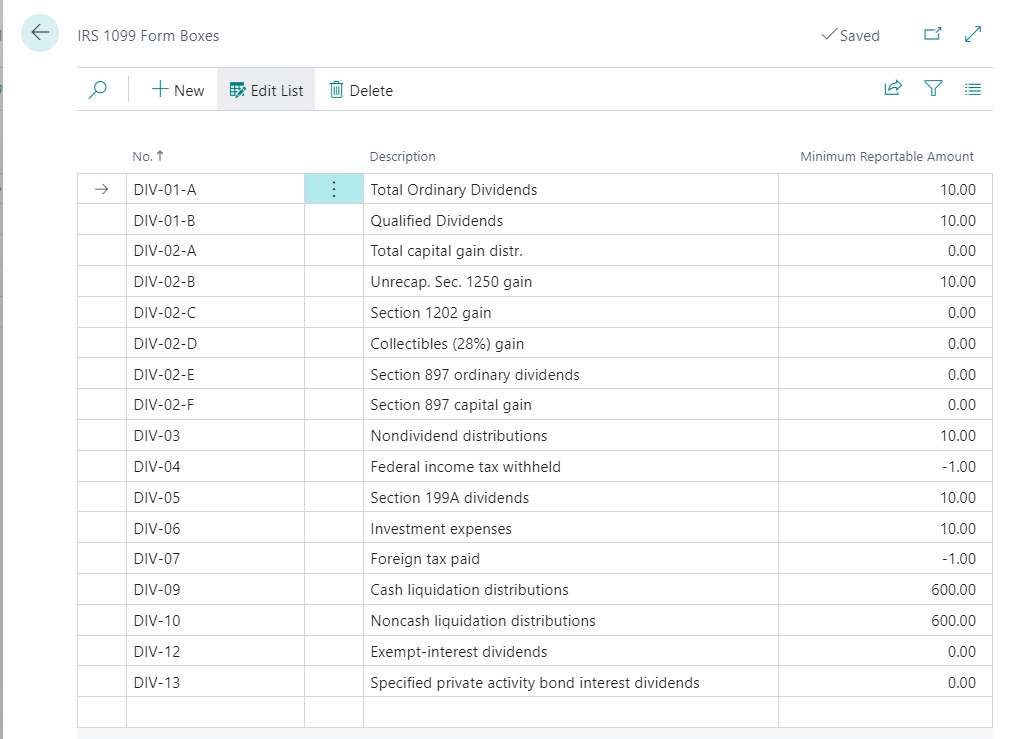
- Close the IRS 1099 Form Boxes page.
- Close the IRS 1099 Forms page.Note: Every year you must create a new reporting period. We recommend that you use the Copy Setup From action on the IRS Reporting Periods page and choose the reporting period you want to copy from. With this process, all form boxes, vendor setup, adjustment and form statement, except the form documents, are copied to the selected period.
Vendors Setup
On the IRS Reporting Periods page, you can run the Vendor Setup action to open the IRS 1099 Vendor Form Box Setup page. Use the page to map the form boxes to each vendor in the period. When you create a document for a vendor, Business Central uses this setup to fill in the form boxes. To do so, follow the steps:
- In the Vendor No. field, specify the vendor number.
- In the Form No. field, specify the vendor number.
- In the Form Box No. field, specify the number of the1099 form box.
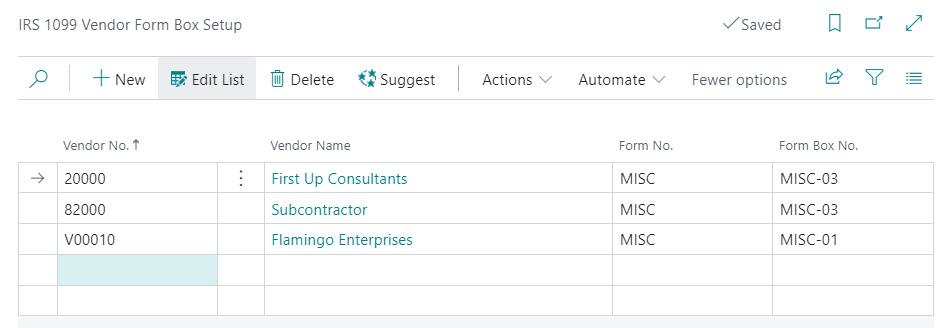
Note: You don’t need to set up vendors manually, and you can use the Suggest action to run IRS 1099 Suggest Vendors automation. This action lets you choose different types of filters to apply to the vendors in the list. Afterward, you just need to add the default Form No. and Form Box No. for the list of vendors.By choosing the IRS Setup action in the Related menu, you can do the same setup on the Vendor List page.
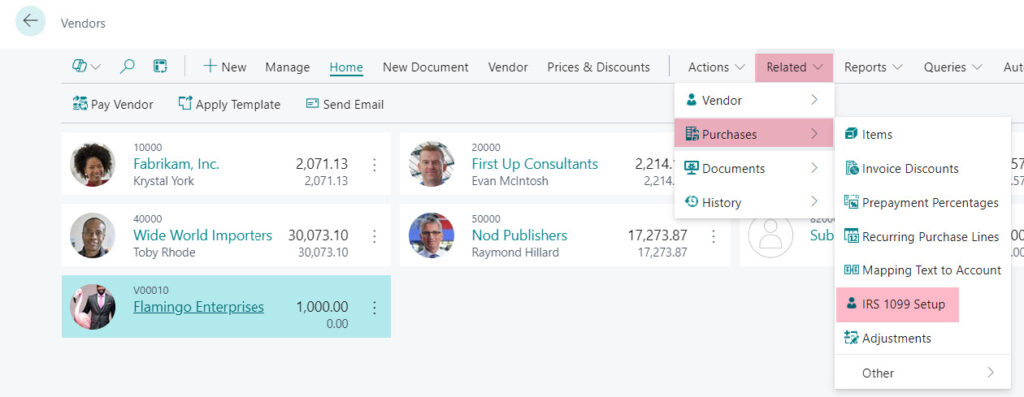
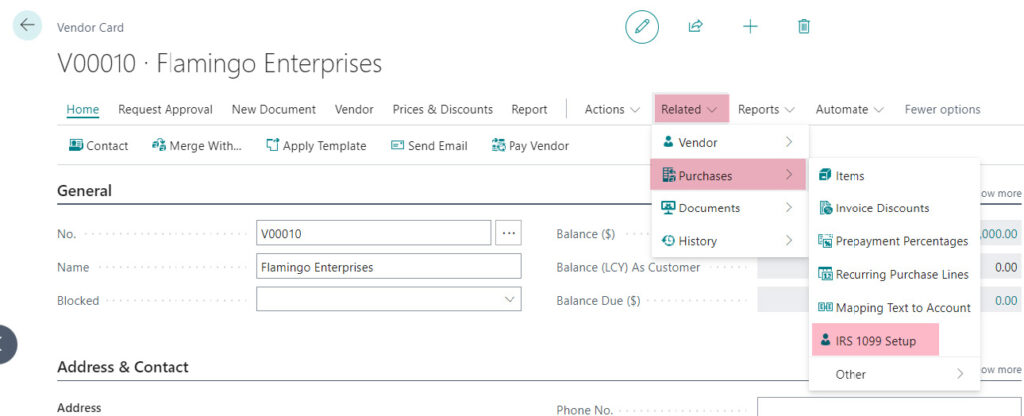
From the Vendor Card:
Note: This vendor setup is related to the specific period you configured on the IRS Reporting Periods page.
You might need to do some more setup on the Vendor Card page. To do so, follow these steps:
- Choose the Search icon and enter Vendors, then choose the related link.
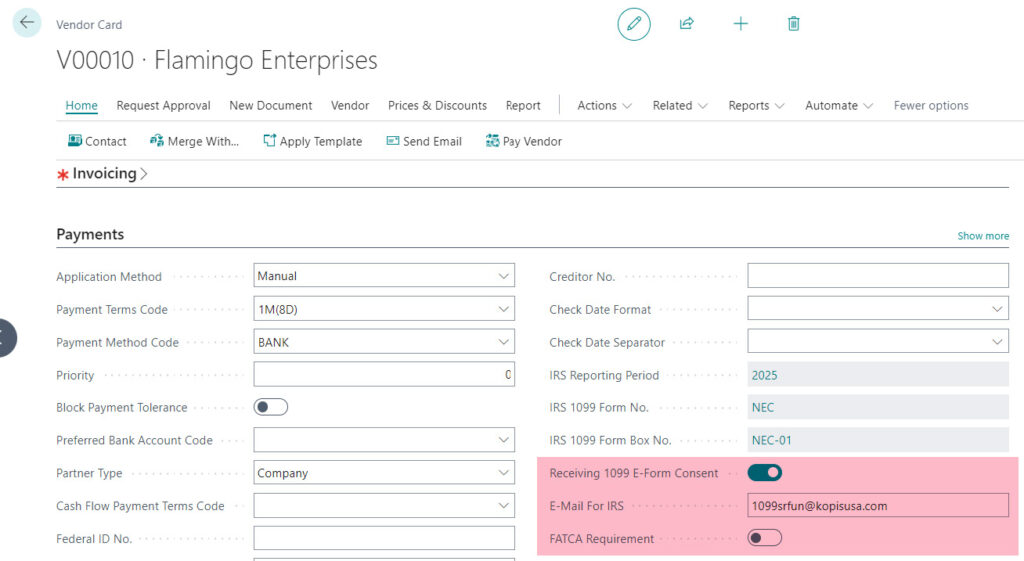
- Details related to 1099 reporting are on the Payments FastTab. You can find default values for the following fields, based on the IRS 1099 Vendor Form Box Setup configuration:
- IRS Reporting Period
- IRS 1099 Form No.
- IRS 1099 Form Box No.
- To configure more required information you can:
- Mark the Receiving 1099 E-Form Consent field to confirm that your vendor provided signed consent to receive their 1099 form electronically using email. You can’t mark this field if a minimum email address isn’t added for this vendor.
- To use different emails for delivering IRS related emails, you can enter this information in the E-Mail for IRS field. Otherwise, Business Central uses the Email field.
- Mark the FATCA Requirement field to specify if the vendor is set up to require FATCA filing.
Print Report Configuration
To print the form substitute documents, there are a few setups you must use. For every single printing form, there’s a Form Statement. These statements are already configured, but you can change or update them. To do so, follow the steps:
- To configure or customize the printed form, choose the Search icon, enter the IRS Reporting Periods, and then choose the related link.
- Use the Forms action to open the IRS 1099 Forms page.
- When you open the IRS 1099 Forms page for a specific form No., choose the Edit Statement action.

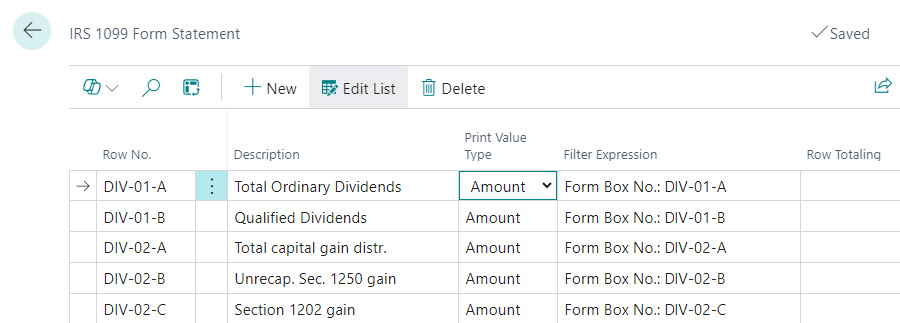
- On the IRS1099Form Statement page, you can setup filters and rules that apply to the form document lines when you print. You can use the following fields to setup the 1099 form statement:
- Row No. – Specifies a number that identifies the line. The number is used as a form box number on the printed report.
- Description – Specifies a description of the 1099 form box on the printed report.
- Print Value Type – Specifies the print value type of the statement. If Amount is selected, then the amount calculated by the filter expression is printed. If the Yes/No option is selected, then either Yes or No is printed based on the Yes/No condition.
- Filter Expressions – Specifies the filter expression of the statement.
- Row Totaling – Specifies a row-number interval or a series of row numbers.
- Print with – Specifies whether amounts on the 1099 form box are printed with their original sign using the option Sign or with the sign reversed using the option Opposite Sign.
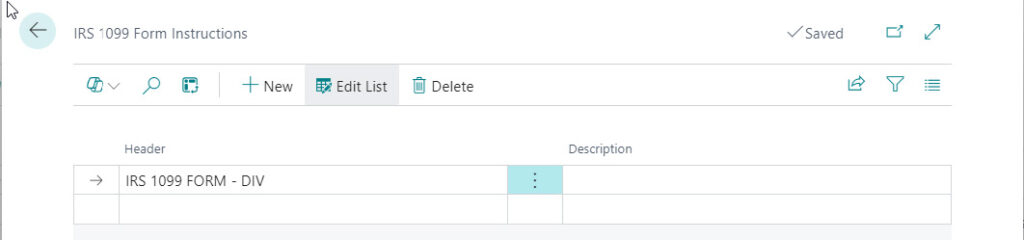
- Close the page.Note: For every form you can setup the recipient instructions. These instructions are printed on the second page of the report layout. This is required for printing the form by the IRS because three instructions explain the meaning of each form box. To do so, on the IRS 1099 Forms page, for the specific form No. choose the Edit Instructions action to open the IRS 1099 Form Instructions page. On the IRS 1099 Form Instructions page, fill in the Header (it will print as bold text) and Description fields (it prints as regular text).

Work with Purchase Documents
To have all IRS-related fields applied to the purchase document, this document must be in the date range, and IRS reporting periods and vendors must be configured. You need to create the purchase document and check if the IRS Reporting Period, IRS 1099 Form No. and IRS 1099 Form Box No. fields are populated in the Shipping and Payment FastTab. These fields will be pre-populated with default values from the Vendor Card page. You can change these values if this specific document needs to comply with a different 1099 form.
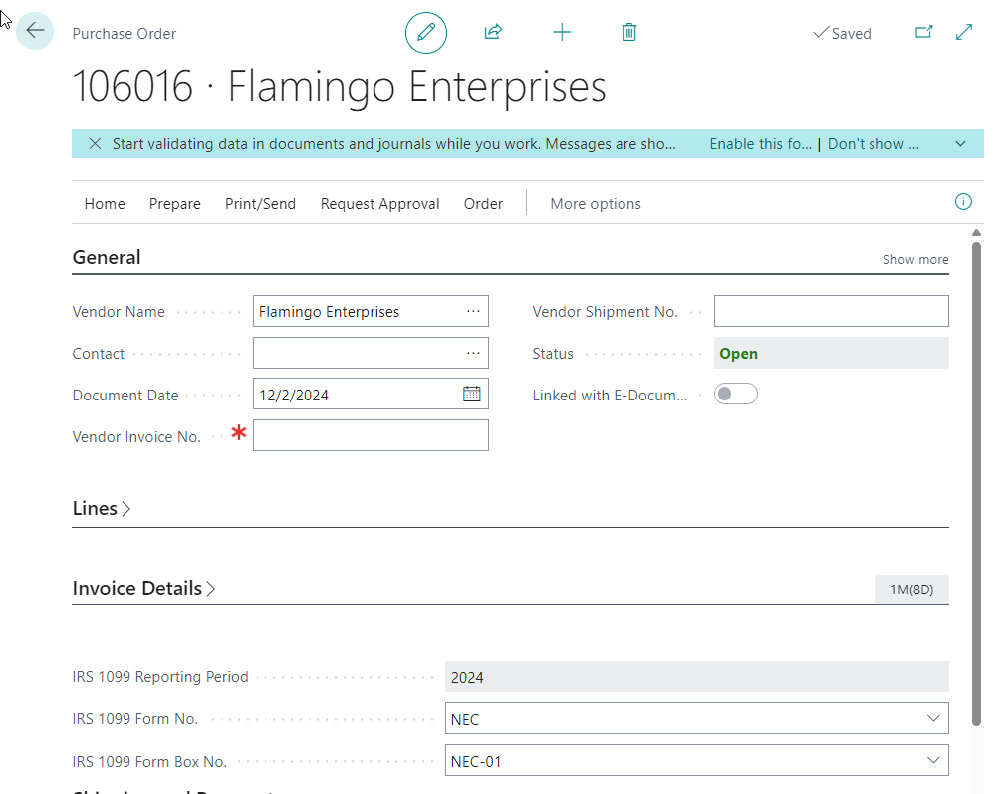
Important: If the Posting Date of the document is not within the reporting period date, the IRS fields will be disabled.
Note: If you do not see populated IRS fields and you expect values there, verify that the document is within the data range that you have configured for IRS reporting, and also check if you have created IRS reporting period for this year, and added this vendor to be 1099 eligible for this reporting year.
When you post this purchase document, you can see the following fields populated in relation to this posted document:
- IRS 1099 Reporting Period
- IRS 1099 Form No.
- IRS 1099 Form Box No.
- IRS 1099 Reporting Amount
If you made a mistake and didn’t use IRS 1099 Form No. and IRS 1099 Form Box No. on the document, or you used the wrong one, you can make corrections. To do this:
- On the Vendor Ledger Entries page, select the line you want to correct.
- Choose the Edit List action.
- Change the IRS 1099 Form Box No. and IRS 1099 Reporting Amount fields.
All 1099 forms are calculated based on the information provided on the Vendor Ledger Entries page. But, make sure that the payment is posted and applied to the invoice during the same reporting period.
Pre-Calculation for 1099 Forms in Business Central
Amount Adjustments
If you have some inaccurate information in the system or missed some document, you can manually adjust values before calculation. To do so, follow these steps:
- Choose the Search icon, enter IRS Reporting Periods and then choose the related link.
- On the IRS Reporting Periods page, choose the Adjustments action to open the IRS 1099 Vendor Form Box Adjustments page.
- Add the amount of adjustment to the IRS reporting amount, using Vendor No., Form No., Form Box No., and the Adjustment Amount.
- Close the page.
Vendor Corrections
If you didn’t configure the vendor properly and forgot to add specific Form No. or Form Box No. but posted the documents or payments already, you can still make corrections. To do this, follow these steps:
- Choose the Search icon, enter IRS 1099 Vendor Form Box Setup and then choose the related link.
- On the IRS 1099 Vendor Form Box Setup page, configure all necessary information and then choose the Propagate action for this vendor.
- Choose how the new form box setup will make updates. You need to decide for which period you want to propagate this change and if you want to update existing opened purchase documents or vendor ledger entries, or both.
- Close the page. Now you can continue with 1099 forms calculations.
Create 1099 Form Documents
To create new 1099 form documents for the reporting years, follow these steps:
- Choose the Search icon, enter IRS Reporting Periods OR IRS 1099 Form Documents and then choose the related link.
- On the IRS Reporting Periods page, open the documents list, and then choose the Documents action.

- On the IRS 1099 Form Documents page, choose the Create Forms action to create IRS 1099 forms based on the filters you want to use:

Note: actions taken here are impacted by the following:- Selecting the period is required. The other choices are optional
- If you don’t select a vendor, then form documents will be created for all vendors.
- If you don’t select a certain form, then form documents will be created for all forms.
- If you don’t select the option Replace then only new form documents will be created.
- If you select the option Replace then the existing form documents will be replaced.
- In the created 1099 form’s documents list you can see the list of all created documents based on the combination of vendors and form numbers. From this list, you can open any of the created documents.
- Once you open the document, you can find the following information on the document header:Vendor No. Specifies the vendor number.
- Form No. Specifies the form number used for calculation of this document.
- ID Specifies the non-editable ID of the document.
- Status Specifies the status of the document. Created document has Open status, but status can also be Released (when user releases it) and Submitted (after submitting to the IRS).
- Receiving 1099 E-Form Consent By selecting this field, you acknowledge that your vendor has provided signed consent to receive their 1099 form electronically. This field can’t be changed at the form as this can be done only on the Vendor Card page. Only a 1099 form with this consent can be sent to a vendor via email.
- Email Specifies the email where the form will be sent if the vendor consented to electronically receive 1099 forms. If this vendor has configured the E-Mail For IRS field, this value will appear; if not, the standard E-Mail field from the Vendor Card page will be used.
- Copy B Sent Specifies whether this form copy has been sent. This field will be marked automatically and can’t be edited.
- Copy C Sent Specifies whether this form copy has been sent. This field will be marked automatically and can’t be edited.
- The lines in the document have the following information:
- Form Box No. Specifies the number of the 1099 form box used in this line
- Calculated Amount Specifies the amount per period and IRS code calculated by the Create Forms action on the list page. This amount is taken from the Vendor Ledger Entries page. If you enable the Collect Details For Line option, then you can see the connected entries. This value can’t be changed.
- Adjusted Amount Specifies the calculated adjustment amount of the document line, the amount you specified for the Period, Vendor, and Form Box during your setup. This amount can’t be changed manually.
- Amount Specifies the amount of the document line. The sum of calculated amount and adjustment amount. This value is used for reporting and the amount can be changed manually.
- Minimum Reportable Amount The threshold to decide whether the certain form box with the reporting amount must be reported.
- Include in 1099 Specifies whether the document line should be included in the 1099. The line is included if the amount is more than or equal to the minimum reportable amount.
- Close the Page
Create 1099 Form Documents
To create new 1099 form documents for the reporting years, follow these steps:
- Choose the Search icon, enter IRS Reporting Periods OR IRS 1099 Form Documents and then choose the related link.
- On the IRS Reporting Periods page, open the documents list, and then choose the Documents action.
- On the IRS 1099 Form Documents page, choose the Create Forms action to create IRS 1099 forms based on the filters you want to use:
Note: actions taken here are impacted by the following:- Selecting the period is required. The other choices are optional
- If you don’t select a vendor, then form documents will be created for all vendors.
- If you don’t select a certain form, then form documents will be created for all forms.
- If you don’t select the option Replace then only new form documents will be created.
- If you select the option Replace then the existing form documents will be replaced.
- In the created 1099 form’s documents list you can see the list of all created documents based on the combination of vendors and form numbers. From this list, you can open any of the created documents.
- Once you open the document, you can find the following information on the document header:Vendor No. Specifies the vendor number.
- Form No. Specifies the form number used for calculation of this document.
- ID Specifies the non-editable ID of the document.
- Status Specifies the status of the document. Created document has Open status, but status can also be Released (when user releases it) and Submitted (after submitting to the IRS).
- Receiving 1099 E-Form Consent By selecting this field, you acknowledge that your vendor has provided signed consent to receive their 1099 form electronically. This field can’t be changed at the form as this can be done only on the Vendor Card page. Only a 1099 form with this consent can be sent to a vendor via email.
- Email Specifies the email where the form will be sent if the vendor consented to electronically receive 1099 forms. If this vendor has configured the E-Mail For IRS field, this value will appear; if not, the standard E-Mail field from the Vendor Card page will be used.
- Copy B Sent Specifies whether this form copy has been sent. This field will be marked automatically and can’t be edited.
- Copy C Sent Specifies whether this form copy has been sent. This field will be marked automatically and can’t be edited.
- The lines in the document have the following information:
- Form Box No. Specifies the number of the 1099 form box used in this line
- Calculated Amount Specifies the amount per period and IRS code calculated by the Create Forms action on the list page. This amount is taken from the Vendor Ledger Entries page. If you enable the Collect Details For Line option, then you can see the connected entries. This value can’t be changed.
- Adjusted Amount Specifies the calculated adjustment amount of the document line, the amount you specified for the Period, Vendor, and Form Box during your setup. This amount can’t be changed manually.
- Amount Specifies the amount of the document line. The sum of calculated amount and adjustment amount. This value is used for reporting and the amount can be changed manually.
- Minimum Reportable Amount The threshold to decide whether the certain form box with the reporting amount must be reported.
- Include in 1099 Specifies whether the document line should be included in the 1099. The line is included if the amount is more than or equal to the minimum reportable amount.
- Close the Page
Submit and Report the IRS 1099 Forms
Register with the IRS
You can’t print 1099 reports directly on pre-printed forms. You can submit 1099 forms using magnetic media or through integration with the IRIS. If you prefer to manually populate your 1099 forms, you can gather all necessary information from the IRS 1099 Form Documents and fill them out manually, outside of Business Central.
You can print or email 1099 copy substitutes to your vendors, including all the details the original form requires.
Submit Using Integration with the IRS
Important: Integration via IRIS APIs will be available in one of the upcoming minor releases.
After you submit the document to the IRS by using the API, the status of the IRS 1099 Form Document changes to Submitted.
Note: More details about the integration will be available when we deliver the new feature.
Submit Using Magnetic Media
Submitting 1099 forms as magnetic media using the FIRE portal is optional for cloud users. However, it’s the only available option for on-premises users because the Microsoft security certificate for A2A communication can only be used in the cloud.
To prepare magnetic media for submission, follow these steps:
To create new 1099 form documents for the reporting years, follow these steps:
- Choose the Search icon, enter IRS 1099 FIRE, and then choose the related link.
- On the request page, specify the tax year for the 1099 forms that you want to report in the Calendar Year field, and the control code of the transmitter that is used to electronically file 1099 forms in the Transmitter Control Code field.
- Fill in the other fields as necessary, and choose OK.Note:Note: If you want to test this functionality, select the Test File field to print a test file.
To Print
After calculation, you can use the Print action to print the document. When you print the report, you can choose which copy to print. You have the following options:
- Copy B is for the vendor.
- Copy C is for the sender.
- Copy 2 is the second copy for the vendor.
Email Automation
Prerequisites
Note: You can’t send the document via email if its Status isn’t Submitted. This restriction helps you avoid sending an un-submitted document to the vendor.
To send forms to your vendor, you must set up the consent and the email on the Vendor Card page. These settings include enabling the Receiving 1099 E-Form Consent field to acknowledge that your vendor provided signed consent to receive their 1099 form electronically using email.
Note: If your vendor gives consent for delivering 1099 forms via email, you can use the E-Mail For IRS field, but you can also keep this field blank and fill-in the standard E-Mail field. It will be used for sending instead.
When the form document is created for a certain vendor, the values are inherited from the vendor card. You can see the values on the Email FastTab of the document if you select Show more.
After you create the document, you can’t change the consent value in the document, but you can change the e-mail if needed. If you want to change some of the default values on the Vendor Card page, you can. Business Central will copy their values to all 1099 form documents where the Status is Open, if you confirm Yes after changing.
Note: Before you send emails, you must have configured the accounts you use for email on the Email Accounts page.
Sending Emails
To send 1099 form to one specific vendor, you can do so from the chosen 1099 Form Document by choosing the Send Email action. It’s also possible to automate this process, and to send emails for multiple 1099 documents. To do that follow these steps:
- Open the IRS 1099 Form Documents list page, select one or more documents, andchoose the Send Email action.

- After you run the Send Email action, select the report type you want to send. You can choose Copy B or Copy 2 (required in some situations). By default, emails are sent only to vendors you haven’t already sent them to. If you want to send emails for all selected documents (and resending for some of them), enable the Resend Email option on the request page.
- Select OK and the email is sent immediately for one document or, if you’re sending multiple emails, it will be scheduled through the Job Queue Entry. If the email is sent successfully for a certain document, the Copy B Sent or Copy 2 Sent flag is set on the IRS 1099 Form Document page.
If you try to send email for only one document and sending failed, an error dialog displays. If you try to send email for multiple documents and sending fails, the error is logged to the Email Error Log field on the IRS 1099 Form Document page. When the job for sending multiple documents is finished, the results are recorded in the activity log.
To open the Activity Log page, choose the Activity Log action on the IRS 1099 Form Documents page.